How to set up tSQLt with a Azure SQL Database on Azure DevOps
Interested in having Azure DevOps run unit tests for you every time your database is built?
Would you like the business logic you have in a database tested every time you make a change to your database?
Along with documentation, one of the best things you can do for your database is to set up unit tests on your stored procedures, if you can find the time. Especially if you have complicated business logic within your stored procedure you’re likely to forget after 2-3 months of developing something else. That way when you make changes in the future if can be sure nothing has been broken by you change.
If you’re looking for an open source way to run unit tests, tSQLt is an excellent way to get started, and its fake tables make it very easy to load data into a table that’s been stripped of any foreign keys or constraints to test the logic of your stored procedures.
Setting up tSQLt might take a little bit of time, but when you’ve got your tests running, it will save you time in the long run.
Setup
The first thing you’ll need to do if you want tSQLt is download the Azure Version of tSQLt (1.0.5873.27393 at time of writing) from their download site.
That download gives you code to run on your Azure database. While you can’t set CLR enabled on standard Azure Databases, you can run the tSQLt.class.sql file to set up all the stored procedures and functions you need to run tSQLt on your database.
Once that is done, set up all the tests you like.
Creating a simple test
Before you create your test, you must create a class to put the test into. You can do that using something like this:
if not exists(
    select 1 from sys.schemas where name = 'ExampleTests'
)
BEGIN
    exec tsqlt.NewTestClass 'ExampleTests'
END
More information can be found here. This basically creates a schema with the name you specify as the class name. From here, you can create tests in that schema. You can create a test like this:
CREATE OR ALTER PROCEDURE ExampleTests.testSprocWorks
AS
BEGIN
    DECLARE @expected INT = 1

    DECLARE @actual INT =
    (
        select 1
    )

    EXEC tSQLt.AssertEquals @expected = @expected, @actual= @actual, @message = 'Test was failed.'

END
This is a very basic test that shows how to run an assertion to use as your test. In a future blog post I hope to go into more details on the kinds of tests you can do with tSQLt. Now you are set up to run your test with powershell and report on it.
Powershell script
Once you have a few tests ready, then you’ll need some Powershell to run all the tests you have produced. The powershell script you’ll be running connects to a database, runs some SQL(One line to run all the tests, another to format the results in the JUnit xml format.), then save the xml produced to an xml file for Azure DevOps to pick up and report on.
 param (
    [string]$serverName = "",
    [string]$databaseName = "",
    [string]$userName = "",
    [string]$password = ""
 )

  $connectionString = "Server=$serverName;Database=$databaseName;User Id=$userName;Password=$password;"
  $sqlCommand = 'BEGIN TRY EXEC tSQLt.RunAll END TRY BEGIN CATCH END CATCH; EXEC tSQLt.XmlResultFormatter'

  $connection = new-object system.data.SqlClient.SQLConnection($connectionString)
  $command = new-object system.data.sqlclient.sqlcommand($sqlCommand,$connection)
  $connection.Open()

  $adapter = New-Object System.Data.sqlclient.sqlDataAdapter $command
  $dataset = New-Object System.Data.DataSet
  $adapter.Fill($dataSet) | Out-Null

  $connection.Close()
  $dataSet.Tables[0].Rows[0].ItemArray[0] | Out-File "./TEST-TSqlT.xml"
As you can see, this is running tSQLt.RunAll to run all the tests, then it runs tSQLt.XmlResultFormatter to format the data as a JUnit xml result set. Then it exports the data in a file called ‘TEST-TSqlT.xml’ to be picked up as Azure DevOps in a later step.
YAML script
Now you have your tests and your powershell script in order, it’s time to put everything together in a YAML script for Azure DevOps pipelines to use. There’s two steps. Step one runs the powershell mentioned above, and step two publishes the test results.
  - task: PowerShell@2
    target: host
    displayName: "Run TSqlT Tests"
    inputs:
      filePath: './RunTests.ps1'
      arguments: -serverName "$(SERVERNAME)" -databaseName "$(DATABASENAME)" -userName "$(USER)" -password "$(PASSWORD)"
  - task: PublishTestResults@2
    target: host
    inputs:
      testResultsFormat: 'JUnit'
      testResultsFiles: '**/TEST-*.xml'
      testRunTitle: 'Publish_TSqlT_TestResults'
With step one/task one, I’m passing in the powershell arguments using pipeline variables. That’s why you’re seeing $(SERVERNAME) and $(DATABASENAME) as they are variables within that pipeline. I’m running this powershell script on the host as well, not running it on any container. That’s why you see the target is host.
Task two is the part that finds the test results your powershell script publishes, and make them available to Azure DevOps. It’s looking for any xml file that starts with the word ‘TEST-‘. If you check the powershell script above, it creates a file named ‘TEST-TSqlT.xml’ which will be picked up by this task.
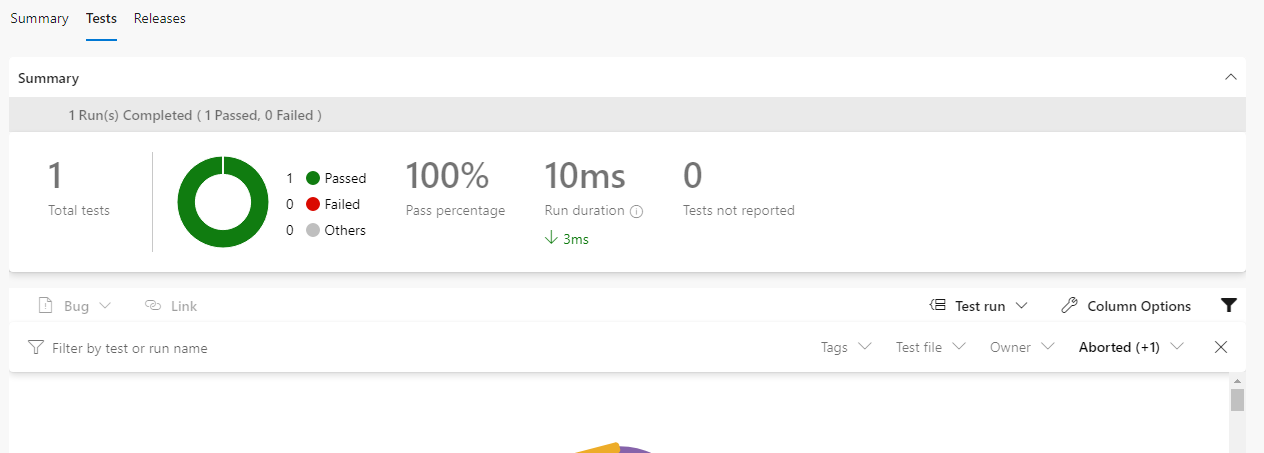
Once that’s all done, once you run your pipeline, you’ll see the test results on your build report. You can click on ‘Tests’ and see something that looks like the following:

And you’re done. Now as you add tests and run your builds, you can be more confident that the code your deploying does everything you want it to do. Hope to hear about the sorts of tests you set up!