
How to set up SchemaSpy with a Azure SQL Database on Azure DevOps
When’s the last time you had a database with up to date documentation?
Have you ever worked with a database with up to date documentation?
I tend to believe that documentation on databases is very important as all sorts of business logic can be ingrained in column length and type choices, and writing little notes on columns and tables can make it much easier for new people to understand, or for you to understand, months after it was created and you’ve moved onto the next thing.
Usually writing documentation is done by writing out a huge Word document that no one reads and no one updates, making the initial documentation a waste of time to generate. What if you could have a computer write out the documentation for you? What if every time you did a build new documentation would be generated for you? Wouldn’t that save everyone a lot of time?
Well there’s a way to do it! Using SchemaSpy, you can pull down a SchemaSpy Docker image and use it on your development database to generate documentation every time you build. I’ll show you how.
Example
First you’ll need a Azure DevOps account. After that, you’ll need to create a pipeline. Once you have your pipeline, put this code in:
steps:
- script: |
      mkdir Output
      chmod -R 777 $PWD/Output
      docker run -v "$PWD/Output:/output" -v "$PWD/DB_Driver:/drivers" schemaspy/schemaspy:latest -t mssql08 -db $(DATABASENAME) -host $(SERVERNAME) -port $(PORT_NUMBER) -u $(USER) -p $(PASSWORD)
    displayName: 'Running schemaspy'
  - publish: $(System.DefaultWorkingDirectory)/Output
    artifact: 'DatabaseDocumentation'
There are 5 variables in there, which you’ll need to set up in Azure DevOps
-DATABASENAME = The name of the database.
-SERVERNAME = The name of the server. If you’re using an azure database it will end in ‘.database.windows.net’.
-PORT_NUMBER = The Sql Server port, usually 1433.
-USER = The username to log in.
-PASSWORD = The password used to log in.
Setup
Now the variables are done, let’s review each line.
steps:
- script: |
      mkdir Output
‘steps’ is just markdown for the steps section, which is where you write all the work your pipeline job will take. ‘script’ is saying you are about to start a bash script. ‘mkdir Output’ is making an Output Directory.
chmod -R 777 $PWD/Output
This line is giving everything permission to read write and execute on that folder so that the SchemaSpy docker container can write to the Output folder you just created.
SchemaSpy run
      docker run -v "$PWD/Output:/output" -v "$PWD/DB_Driver:/drivers" schemaspy/schemaspy:latest -t mssql08 -db $(DATABASENAME) -host $(SERVERNAME) -port $(PORT_NUMBER) -u $(USER) -p $(PASSWORD)
    displayName: 'Running schemaspy'
This section describes the step being run as what is in ‘displayName’, so “Running SchemaSpy”, and running the SchemaSpy image itself. Important note, this step is mounting volumes for Docker using the ‘-v’ flag. This flag allows you to mount an existing directory in your system to a directory in the Docker container, using “source_directory:target_directory” as the syntax. Other important note, you’re going to want to find the driver you want to use for MS SQL yourself and put it in a “DB_Driver” directory to be picked up. I had to use the jre8 version of the 9.2 JDBC connection driver in order to get my connection to work. [Here’s a link to find the driver] (https://docs.microsoft.com/en-us/sql/connect/jdbc/download-microsoft-jdbc-driver-for-sql-server?view=sql-server-ver15). If it’s out of date, just google “Download microsoft 9.2 jdbc driver for sql server”. Put the version that mentions “jre8” in your “DB_Driver” folder.
Now you have your volume mounts set up, notice how “docker run” is running the “schemaspy/schemaspy:latest” image from the Docker website. That means you are running the latest version of the SchemaSpy Docker image, every time this runs. From there, now you just need to decipher the options. There’s a few:
-t = Which driver you are using. In this case we are using mssql08, or any version of Microsoft SQL Server JDBC since Sql Server 2008.
-db = The name of the database you want to run this on. It’s using an Azure DevOps variable.
-host = The server you want to run this on. Also using an Azure DevOps variable.
-port = The port to connect to the server on. Same as above.
-u = The username to connect with. Same as above.
-p = The password to connect with. I can only say the same thing so many times. See above.
Output generation
Once all that is done, you’ll end up with documentation created in the “Output” directory, which could then be uploaded to a central documentation website if needed, but for now, we’ll publish the documentation for use later with the following few lines:
  - publish: $(System.DefaultWorkingDirectory)/Output
    artifact: 'DatabaseDocumentation'
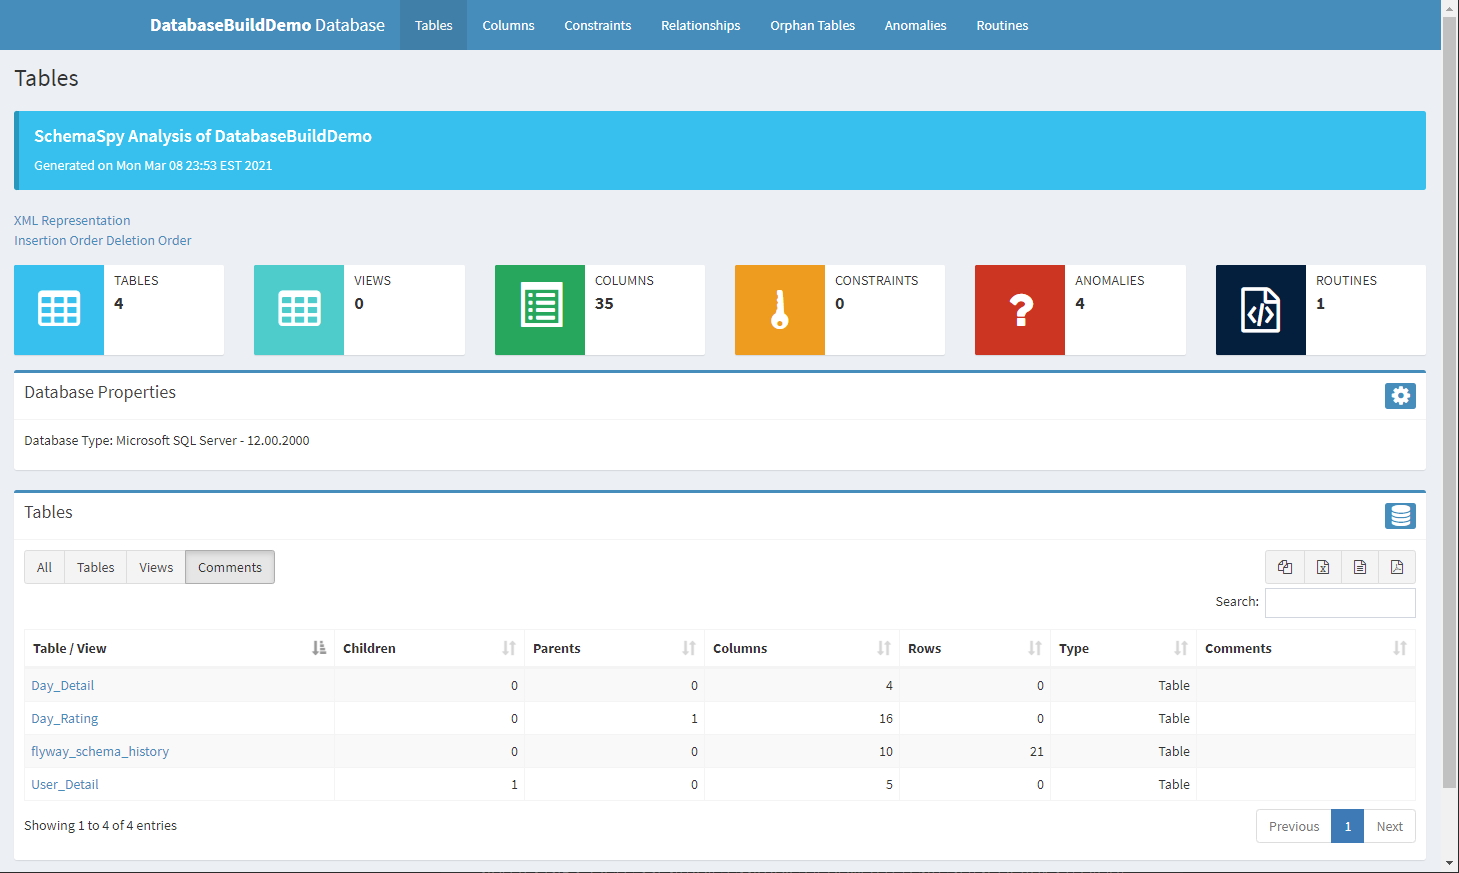
Here we are selecting the directory we want to pull from, which is the “Output” directory we created and had SchemaSpy output into. Then we give the artifact a name, in this case “DatabaseDocumentation”.
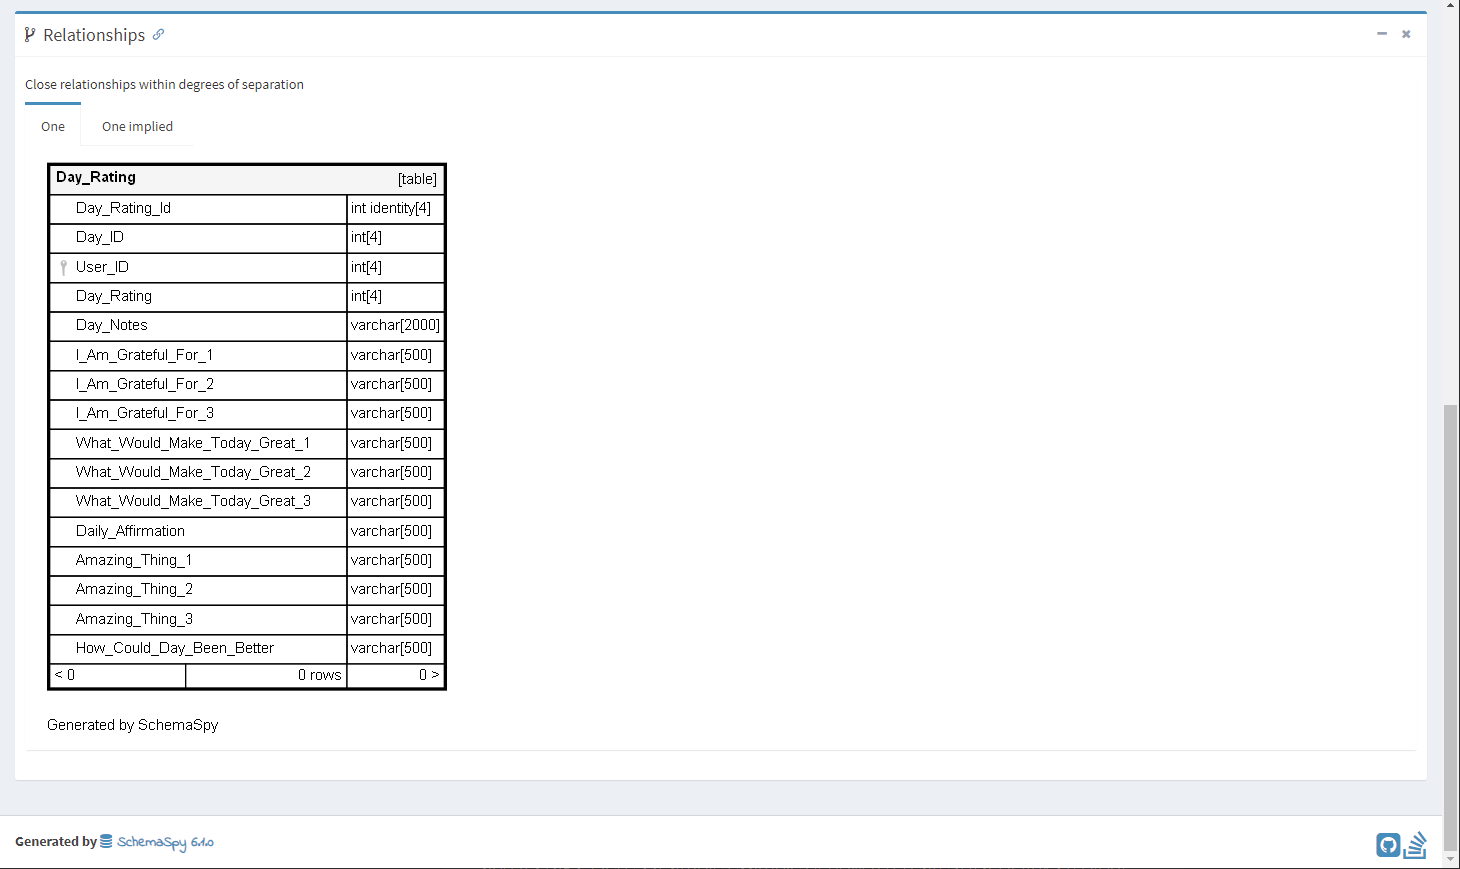
You will then see the documentation in your artifacts when the build has completed, and you can download it when you would like. If I get time, I might put a post up describing how to post the documentation to a website. I’m guessing it will involve an FTP of some sort, which I’m hoping you can do in YAML on Azure DevOps easily enough.
Thanks for reading!
Nathan